Managing your media library properly can bring great rewards. If you are using iTunes as a management tool on a Mac, make sure you use an aftermarket program such as Bit Perfect, Audirvana, Pure Music or Amarra to get the sound right. Our specific recommendation is for Bit Perfect. If you are running iTunes in a Windows environment, we are still searching for a way to make it bit perfect if sample rates change.
Add music from a hard drive or data source
To bring music into the iTunes library you can simply highlight a group of tracks or albums on an existing hard drive and drag them into the iTunes desktop. Or, you can go to File->Add to library:
 Add music from a CD or DVD
You can also rip or copy music from your CD's or DVD data discs. To do this, make certain your import settings have been set to the proper file type. Our recommendation is to use either AIFF (uncompressed) or Apple Lossless compression. To set the import settings go to Preferences->General->Import Settings:

Once you have imported your media into iTunes you can now manage your library.
Quick edit
In either the album or song view, you can click any of the text field and edit their content directly. Here's an example of what that looks like in album view.

The blue highlighted area has been clicked on, allowing direct editing. The same can be applied to any field in the song List View as well.
For larger more complex editing features, opening the tag editor window is recommended.
Tagging editor window
The best tool to manage your library can be accessed by choosing
Get Info and opening the Info dialog box. To access this dialog box you can
right click on any track or album and choose
Get Info. You can also go to the File->Get Info menu.

Once you have opened the
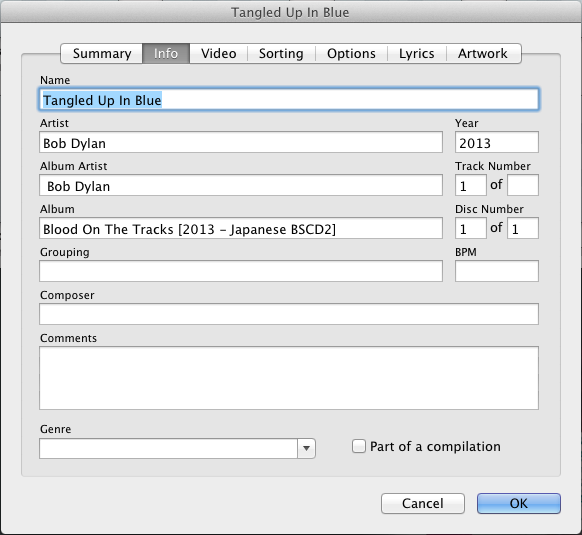
Get Info dialog box you can manage all aspects of the individual tracks, albums, titles and artwork. Here is what the
Get Info window looks like:

Use this intuitively laid out window to manage Artwork (open the Artwork tab of this window), or change the track, composer, genre, artist titles of your library.
If you have a compilation album, with different artists on multiple tracks, choose the checkbox labeled "Part of a compilation". You can highlight a group of tracks, right click the highlighted group opening the Get Info dialog box, check Part of a compilation, and this will become an album. Choose various artists for the album's artist field. You can still enter individual track titles and artists within the compilation.
Genre editing can be either custom named or choose from the list. To add a custom genre type, simply place the cursor in the Genre box and type whatever you want. To choose from a predefined list, click the arrow and choose from the list.
Adding or changing cover art
iTunes is pretty good finding most cover art using the Gracenote database. This database is targeted more at popular music than it is jazz and classical - and certainly has very few Audiophile recordings in its list. Many of the tracks and albums Audiophiles might add need custom art added. Google Images is the single best source for album art. An entire universe of art is available. Just type the artist, orchestra or band name into a Google search field, click on Images and select the appropriate image. Click on that image. It centers in the browser. Right click the image and choose Save Image As and it will download to your desktop. If you cannot find the art on Google, Amazon is also a good source.
To add or change an existing image, you must be in the tagging editor.

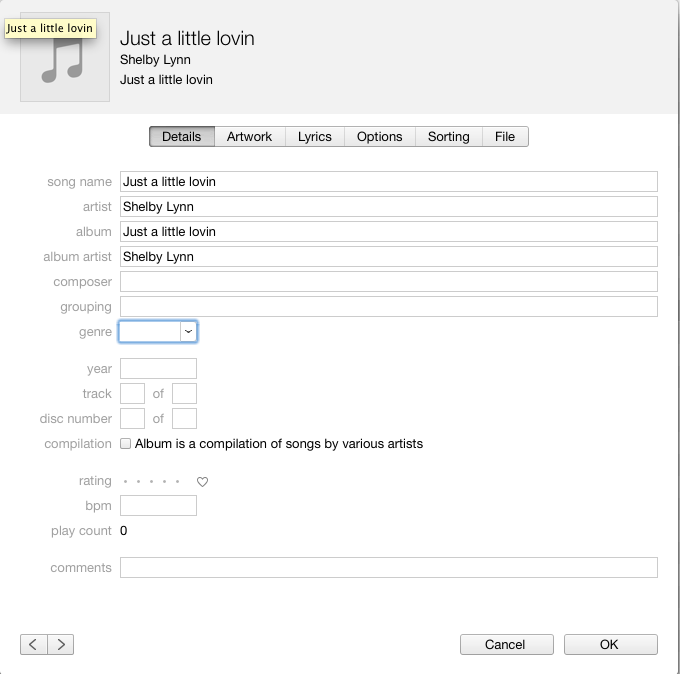
Note, in this example, Shelby Lynn hasn't any artwork. Click the
Artwork tab. Then click
Add Artwork and navigate to where your downloaded file is. In this case, I made a folder labeled Artwork that is on the desktop. Open.

This adds the artwork to the album or track selected.

Artwork can be changed, or added through this method.
 Add music from a CD or DVD
You can also rip or copy music from your CD's or DVD data discs. To do this, make certain your import settings have been set to the proper file type. Our recommendation is to use either AIFF (uncompressed) or Apple Lossless compression. To set the import settings go to Preferences->General->Import Settings:
 Once you have imported your media into iTunes you can now manage your library.
Quick edit
In either the album or song view, you can click any of the text field and edit their content directly. Here's an example of what that looks like in album view.
 The blue highlighted area has been clicked on, allowing direct editing. The same can be applied to any field in the song List View as well.
For larger more complex editing features, opening the tag editor window is recommended.
Tagging editor window
The best tool to manage your library can be accessed by choosing Get Info and opening the Info dialog box. To access this dialog box you can right click on any track or album and choose Get Info. You can also go to the File->Get Info menu.
 Once you have opened the Get Info dialog box you can manage all aspects of the individual tracks, albums, titles and artwork. Here is what the Get Info window looks like:
 Use this intuitively laid out window to manage Artwork (open the Artwork tab of this window), or change the track, composer, genre, artist titles of your library.
If you have a compilation album, with different artists on multiple tracks, choose the checkbox labeled "Part of a compilation". You can highlight a group of tracks, right click the highlighted group opening the Get Info dialog box, check Part of a compilation, and this will become an album. Choose various artists for the album's artist field. You can still enter individual track titles and artists within the compilation.
Genre editing can be either custom named or choose from the list. To add a custom genre type, simply place the cursor in the Genre box and type whatever you want. To choose from a predefined list, click the arrow and choose from the list.
Adding or changing cover art
iTunes is pretty good finding most cover art using the Gracenote database. This database is targeted more at popular music than it is jazz and classical - and certainly has very few Audiophile recordings in its list. Many of the tracks and albums Audiophiles might add need custom art added. Google Images is the single best source for album art. An entire universe of art is available. Just type the artist, orchestra or band name into a Google search field, click on Images and select the appropriate image. Click on that image. It centers in the browser. Right click the image and choose Save Image As and it will download to your desktop. If you cannot find the art on Google, Amazon is also a good source.
To add or change an existing image, you must be in the tagging editor.
 Note, in this example, Shelby Lynn hasn't any artwork. Click the Artwork tab. Then click Add Artwork and navigate to where your downloaded file is. In this case, I made a folder labeled Artwork that is on the desktop. Open.
 This adds the artwork to the album or track selected.
 Artwork can be changed, or added through this method.


