


 You are looking at the main aluminum plate that will support the entire table. It is resting on the aluminum plate that was previously bonded to the Minus K platform. In order to prevent this plate from accidentally moving once the entire table is assembled, a 1/8" thick sheet of high durometer rubber was bonded to the Minus K top plate, separating it from the plinth you are now viewing. In order to prevent the plate you are seeing in this picture from moving by an accidental bump, it has been semi-permanently attached to the 1/8” rubber sheet with four 3” diameter circles of two faced tape (one in each of the four corners).
  We are now ready to begin the final assembly of the turntable. Note two of the four hold down bolts in the corners of the top plate. These bolts are used to firmly attach this plate to the bottom frame supporting the Minus K. This will prevent any accidental movement until the table is fully assembled. At that time, these hold down bolts will be removed, and the table will be free to float. We have placed the 1 ½” thick triangular aluminum support plate on which the main fiberglass plinth is resting. We are now ready to place the 3 drive motor assemblies. Note the brass isolation point and cup, many of which will be used throughout the design of the table.
 Here we see the anodized VPI chassis blocks being firmly secured to the aluminum sub-plates that were machined, anodized, and filled with the epoxy/lead matrix.
  Here we see the table with the platter and one of the three drive motors in place. The parts have all been covered with a removable, protective plastic film. This will prevent any accidental damage to the anodized aluminum parts.
  You are looking at the entire table, minus the arms, properly positioned on the Minus K isolator. You will notice the extensive use of the brass points and cups for vibration isolation. Also note the Sutherland Time Line puck placed on the center spindle of the platter. It will be used to set the speed of all three motor drives powering the main platter. It was my original intention to use a Roadrunner tachometer to indicate when the proper speed has been attained but I decided to eliminate it and simply use the Time Line.
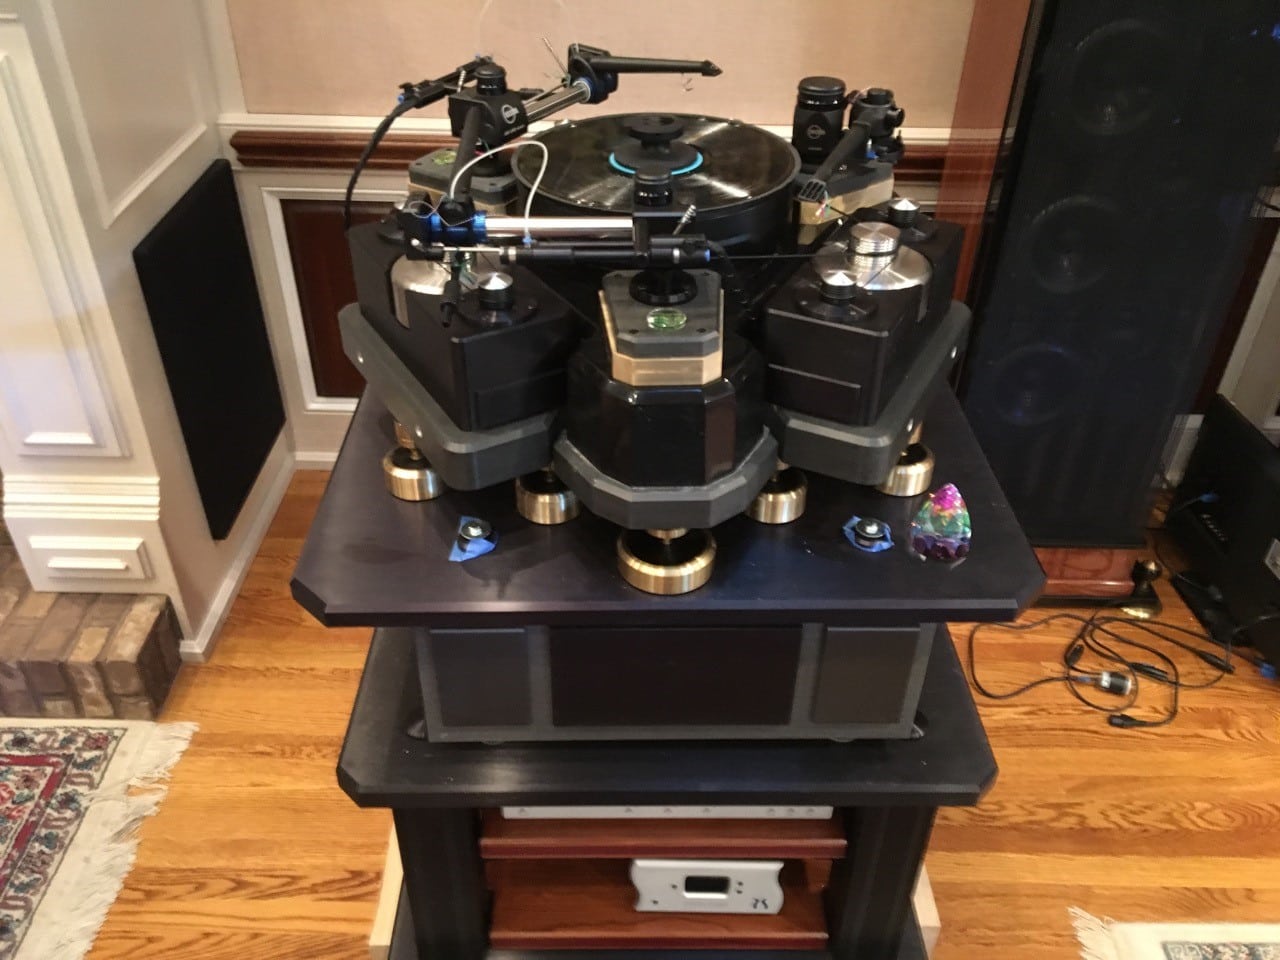
This picture depicts all three drive motors in place, along with the two Kuzma Air lines and single Kuzma four point tonearm installed.
I might call to your attention the extensive use of the two-colored anodizing done on all the aluminum plates, etc. Due to the fact that I have an extensive amount of Krell electronics throughout my system, I called my very good friends at Krell and asked if they would be willing to have all my aluminum pieces, parts, plates, etc. sent to them to be brushed and anodized to match all my Krell gear. They were more than happy to do so and the results are visually stunning.
[And that’s the conclusion of Ken’s story of the build of his amazing turntable. I’m grateful that Ken took the time to document the process, and was willing to share it with Copper readers. There is one more element to add to this story, and that’s told by Ken himself— in an extraordinary video his son produced. Link to the video is below, and I hope you’ll take six minutes and watch it. Our best wishes to Ken and his whole family.–-Ed.]
0 comments